
Tutorial 3
|
|
Material needed:

|
SUmmary:
In this tutorial we will apply the for loop to our blinking LED example to make the LED blink an specific amount of times, we will also use the while loop to accomplish the same goal.
New PRE-WRITTEN FUNCTIONS OF ENERGIA THAT WE ARE GOING TO BE USING:
|
This functions are already on Energia and are there for us to use it and make our life a little easier:
|
Arithmetic conditions to be more specific:
|
Step 1:
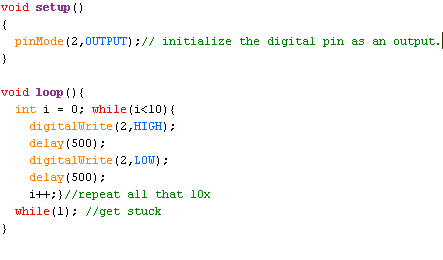
Copy the code shown below into Energia

Step 2:
Once you have it in Energia, compile it, then upload it to the brain of your launchpad
Step 3:
By this point you should see that the GREEN_LED on your launchpad blinks exactly 10 times and no more.
Take your time to analyze your code and understand it, then go ahead and go to the next step.
Take your time to analyze your code and understand it, then go ahead and go to the next step.
Step 4:
Now we are going to repeat the exact same steps but now instead of the for loop, we are going to use the while loop, which is shown below. And after you compile it and download it, you should see that the exact same thing happens but now with the RED_LED.
Congratulations, now you know how to use the for-loop and the while loop but, take your time to analyze the code.
Still if you do not understand what is going on, I will make a simple explanation of both codes below:
For-loop
|
While-loop
|
TIP:
|
for (int i = 10; i > 0; i--) {
// counter i starting off at 10, decrementing by 1 each time // until 0. // do something 10 times } |
for (int k = 0; k < 20; k=k+2) {
// counter k starting off at 0, incrementing by 2 each time // until 20. // do something // So it's still do something 10 times } |
